
Within Teamwork Desk, you can set up the
Customer Portal to allow your customers to
interact with their tickets.
In the Customer Portal, customers can:
- View their ticket history
- Reply to tickets already created
- Submit new ticket requests
- View Help Docs before submitting a new
ticket request
Enable the Customer
Portal
🔑 Only site
administrators can access the site settings to
enable the Customer Portal.
- Click your profile icon in Teamwork Desk's
main navigation menu.
- Select Settings.
- Switch to the Customer
Portal tab.
- Click Enable customer portal.

Once enabled,
the Customer
Portal section allows you
to control general settings
and customize your Customer
Portal's appearance.

📝 If your Teamwork Desk account
is associated with an active Teamwork.com
subscription with the paid Advanced Security add-on, SSO is applied to
your Customer Portal by default.
General
settings
Under General
settings,
you can customize the high-level settings
for
your portal, such as language, custom
domain,
and help docs.
Basics
- Language: Choose a
language
for your Customer Portal or
use the language of the user's
browser.
- Custom
Domain: Add
a custom
domain for your Customer
Portal.
- The default URL for your
Customer Portal is displayed
here, in the format: https://yoursitename.teamwork.com/support/ .
- You can add your
own
custom domain instead
by
adding a CNAME which
points to sslproxy.teamwork.com for US accounts or sslproxy.eu.teamwork.com for EU accounts. This is required to make your custom domain for your Customer Portal work.
- Help Docs: Enable one
or more of
your Help
Docs sites to be
displayed on the
home page of your Customer
Portal so that your customers
can view the corresponding
articles directly in the
Customer Portal.
- 📝 The top 10 most popular articles across all categories on each Help Docs site are displayed in the Customer Portal. Customers can use the search field to search the entire suite of available published articles.
- Add Inboxes: Choose the inbox(es) customers can submit tickets to via the Customer Portal.📝 Agent replies display as sent from the agent or inbox name depending on the setting chosen at inbox level.
- Inbox
Alias: Set a
custom label
that will be displayed to
customers when choosing an inbox,
instead of the inbox name.
Customer
Permissions
In the Customer
Permissions section, you
can manage multiple
permissions your
customers:
- View/edit
priority: Allows
customers to set ticket
priority.
- View/edit
type: Allows
customers to choose the type
of ticket being
submitted.
- View/edit
tags: Allows
customers
to view the tags your agents have
applied to the their
tickets.
- See
agents: Allows
customers to see the name of the
agent assigned
to their tickets.
- Close
tickets: Allows
customers to close their own
tickets.
Customer Portal
permissions can be enabled at
either company level or individual
user level.
✔ The
permission option for viewing company
tickets is available on Premium
subscriptions and above.
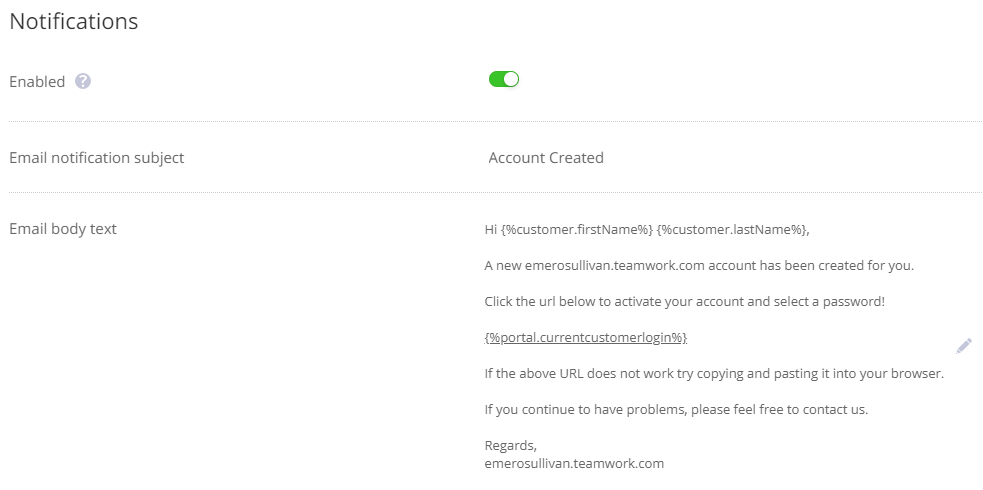
Notifications
When notifications are
enabled, your
customers will receive a welcome email
with their Customer Portal login setup
when
they send in their first (or next)
ticket.
📝 The password
link will
only
remain active for 24 hours.
If your customer does not activate
within
that time, they can resend the
password
from the Customer Portal login
screen.
When the Customer Portal is enabled for
your site and Customer Portal
notifications are turned on, you will also
see an option to send a Customer Portal
welcome email when creating new
customers on your site.

For more information, see: Changing the
Appearance of Your Customer
Portal