
✔ Available on
all subscriptions
| What | Attach files to tasks, view
existing files on tasks, and
manage files attached to
tasks. |
| Why |
|
| Who |
|
| When | If you have a file
related to what you're
working on (either
reference information or
the actual work
itself).
|
| What | Attach files to tasks, view
existing files on tasks, and
manage files attached to
tasks. |
| Why |
|
| Who |
|
| When | If you have a file
related to what you're
working on (either
reference information or
the actual work
itself).
|
Before you
start
The Files feature
needs to be turned
on in the project
settings.
Privacy
- Existing project files
maintain their own privacy
when attached to a task.
- New
files uploaded to a task
inherit the
task's privacy. The file is
being newly
added to the project so has no
existing
privacy settings of its
own.
Add
files to a
task
Files can be attached to
tasks in
the Table, List,
or Board view
of your
project. Want to
save time?
Add multiple files
to a task at
once.
These steps showcase Table view:
- Click Jump to in
the left
navigation menu on on your
site.
- Search for and select a project.

- Select Table from
the project navigation
menu. The Table
tab might
be
hidden under the More... option.
- Click the task name to open the task details panel.

- Click the paperclip icon in the quick actions toolbar at the top of the view.
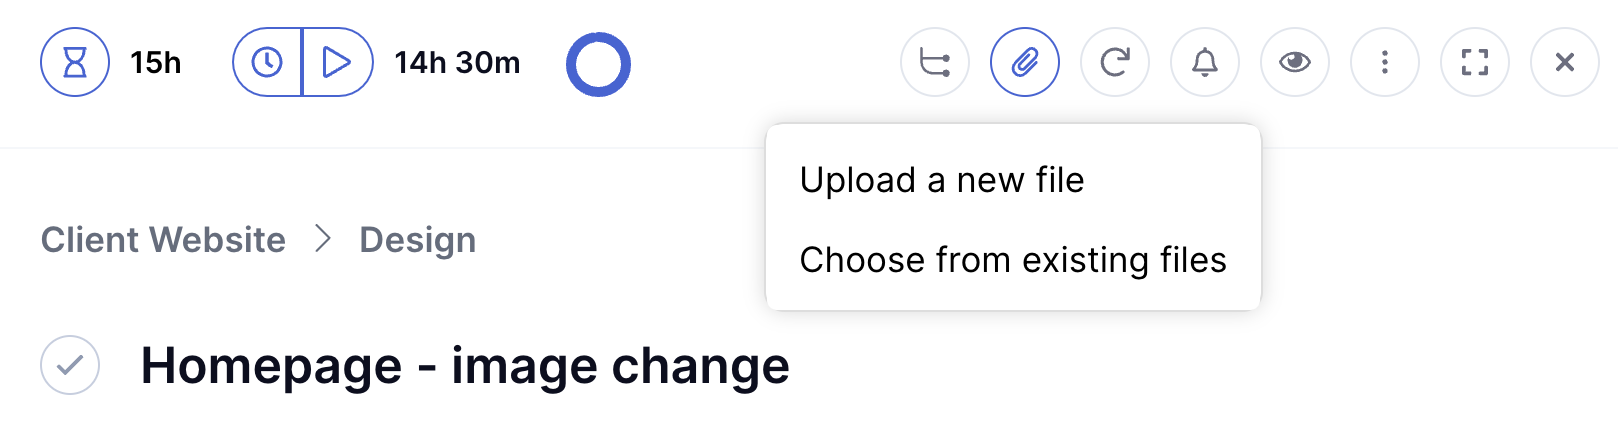
- Choose how you want to attach a file:
- Upload a new file - browse for and select a file to upload from your computer.
- Select a file in the file browser. Need to attach multiple files? Hold down the Shift key on your keyboard and click the name of each file you want to upload.
- Click Open.
- Choose from existing files - choose from files already uploaded to the project's Files area.
- Select the checkbox to the right of the relevant file(s) in the existing files window.
- Click Select Files.
- Click the X in the top right of the task details view to close it and return to the Table area.
Any
files you attach
are
added to
the Attachments area
at the bottom of
the task and a
paperclip icon is
displayed beside
the task
name.

View
task
files
View files attached to
tasks
from the List, Table, or Board views. In
each view,
tasks with attached files
display
a paperclip
icon beside
the task name. The
number
beside the icon
indicates how many
files are attached to
the
task.

- Click Jump to in the left
navigation menu on your
site.
- Search for and select a
project.
- Select Table, List, or Board from the project navigation bar. The relevant tab might be hidden under the More... option.
- Access the task's files:
- From List or Board: Click the paperclip icon to open the attached files view. Want a shortcut? Hover over a task (or card) and use the keyboard shortcut V to open the task details panel, then scroll to the Files subsection.
- From Table: Click the task name to open the task details panel, then scroll to the Attachments subsection.
- Preview or download a copy of the file:
- Click the magnifying glass beside a file to preview it. In Table, you'll need to hover over the file to see the option.
- A preview of the file opens in an embedded window in Teamwork.com.
- Click the cloud (with a downward arrow) to download a copy of the file to your computer. In Table, you'll need to hover over the file, then click the downward arrow.
Remove a file
from a task
No longer need a file
on
your task?
- Click Jump to in the left
navigation menu on your
site.
- Search for and select a
project.
- Select Table from the project navigation bar. The Table tab might be hidden under the More... option.
- Click the task name to open the task details panel.
- Go to the Attachments section.
- Hover over a file.
- Click the ... (ellipsis) to the right of the file name.
- Next:
- Click Remove file from task to detach the file from the task. Don't worry, it'll stay in the project's Files area in case you need it later!
- Click Delete file to remove it from the task AND delete it from the project's Files area. We don't suggest this option unless you're sure the file is no longer relevant to the project.
- Click Yes, Delete this file to confirm.
Another
option...
You can also delete
files from
the List and Board views.
List:
- Click
the paperclip icon
beside a task to
open the
attached files
view.
- Click
the downward
arrow to
the right
of the relevant
file.
- Select Delete from
the dropdown
menu.
- Click Yes, Delete this File to confirm.
Board:
- Click the relevant
task card to
open the task
details
panel.
- Scroll to
the Files section.
- Click
the downward
arrow to
the right
of a file.
- Select Delete from
the dropdown
menu.
- Click Yes,
Delete
this
File to
confirm.
Best
practices
- Keep it relevant: Files
are
valuable resources. Just
remember,
they're meant to be related to
the
specific task you're adding
them to.
If a file applies to the
project in
general, you're better off uploading
the file
directly to the
project.
Elevate your
files
- Iterate: Upload a new
version of an
existing file each time you
complete a
phase of work. An
added bonus is
minimizing clutter - the
versions all
sit together in one file
group!
- Integrate: Connect your
file
storage accounts (such as
Dropbox or
Google Drive) to the project,
then link
relevant files from those
platforms to
tasks.